
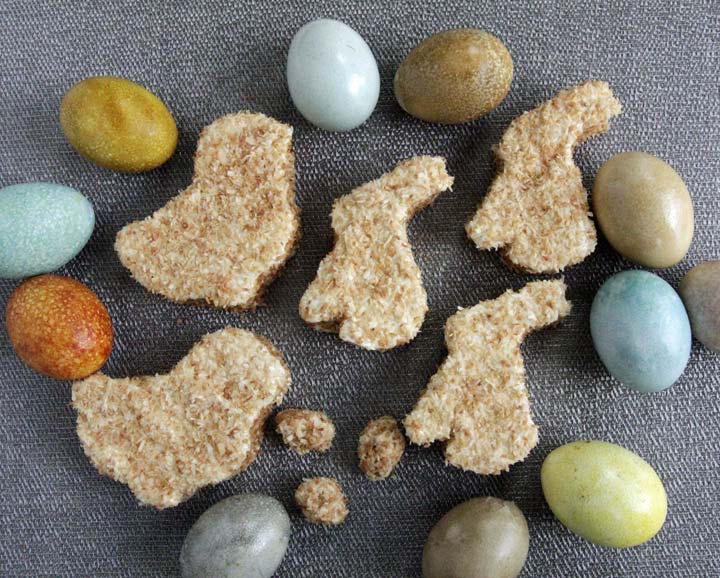

Marshmallow Easter Candy
An egg-cellent Easter treat! Everyone’s favorite sugary, fluffy Easter treat can be made just as delicious with healthy ingredients. We skip the artificial chemical-drenched marshmallows of our youth and use gelatin. And since these are homemade, you can use real vanilla, not some imitation flavor. Adding toasted coconut makes it even tastier and cuts out the harmful trans fats in the marshmallows' hydrogenation process.
Prep time: 20 min active; 6 hours inactive • Cook time: 30 mins • Yield: One 9- x 13-inch pan or 10 large cutouts using 4-inch cookie cutters
Ingredients
- 1 cup water, divided into two ½ cups (use a liquid measuring cup)
- 2 ½ tablespoons grass fed beef powdered gelatin (you can use Knox brand gelatin if you can’t find the grass fed)
- 1 cup honey or maple syrup (use a liquid measuring cup)
- ¼ teaspoon sea salt
- 1 teaspoon pure vanilla extract or flavor of your choice, i.e. mint, lemon, orange, etc.
- 2 cups shredded coconut, toasted and sugar-free, divided
Directions
Line a 9- x 13-inch pan with parchment paper in both directions, leaving extra paper over the edges to use as handles. Evenly cover the bottom of the prepared pan with ¾ cup toasted coconut.
Pour ½ cup water into the bowl of your stand mixer, and add gelatin powder. Let it sit for at least 10 minutes to soften.
Pour the other ½ cup water into a medium saucepan, add honey/maple syrup, and salt. Insert candy thermometer into saucepan. Bring the mixture to a boil over medium-high heat, and don’t move away from the stove. The mixture can quickly bubble up and foam, and you don’t want it to boil over.
Boil the mixture until it comes to 240º to 242º F. Be precise. This is the soft ball stage, when a drop of syrup dropped into ice water forms a pliable ball. (Unless you’re a seasoned candy maker, I wouldn’t make these without a candy thermometer.) Timing to reach 240º to 242º F can greatly vary based on the size of the pan and the burner. It will mostly likely be between 15 – 25 minutes, but it could take longer.
Using the whip attachment, set mixer to medium speed and slowly pour the syrup into the mixing bowl in a steady stream. When mixed thoroughly with the gelatin mixture, add vanilla or flavoring, and turn mixer to high. Continue to whip until the volume has tripled and you have a fluffy bowl of marshmallow cream. It’s ready when you lift the whip from the mixture and the marshmallow cream holds it shape.
Working quickly before the gelation sets, pour marshmallow cream into the prepared pan. Spread evenly with a rubber spatula or an offset spatula and top with ¾ cup toasted coconut.
Wait 4 to 6 hours until firmly set. Don’t try to rush the process; the marshmallows could turn out soggy or too wet on the inside.
Lift marshmallows out of pan using parchment paper, loosening the parchment from around edges with a sharp knife or scissors. Grease the sharp edge of the cookie cutter and press into the marshmallow through to the bottom. Lift out and place on a parchment lined surface. Continue cutting until you have used up the marshmallows. You will have all the edges left.
Lightly oil your hands, put a 1-to 2-teaspoon-size portion between your palms, and roll into little marshmallow eggs. Roll in toasted coconut to cover.
To cover the cut edges of the cutouts, lightly spray with a fine mist of coconut oil and pat on toasted coconut. Store for 3 to 5 days in a sealed plastic bag or container.
Notes:
Candy making is a practiced art (and never foolproof). If you are precise in the temperature and add the syrup slowly and evenly to the gelatin, you should have success. However, don’t make these on a humid day; they won’t set up properly and they’ll turn out soft and soggy.
The peeps can be made using a piping bag, but unless you have the steady hand and piping skills of a professional baker your peeps may look more like little marshmallow blobs.
Thanks to Jenni Hulet, author of the Urban Poser, for the original marshmallow recipe.